Upserts in Amazon Redshift - A Hands-On Tutorial

Amazon Redshift was first announced in 2012 as a new cloud-based analytical data warehousing service. Since then, it has evolved into a robust analytical database that has become an essential tool for businesses of all sizes. With its roots in Postgres version 8.0, Redshift has come a long way in the past decade. Dealing with vast amounts of data stored in a columnar architecture, Redshift supports concurrent queries on compressed data, thereby contributing to query performance, reduced storage costs, and improved I/O efficiency.
Redshift also comes with a few known limitations as a result of the aforementioned performance factors. One of those includes the native support for constraints. Although one can define constraints on columns, they are not strictly enforced. This means that the constraints will only be used for query planning but not to define uniqueness or referential relationships.
Preventing duplicates in analytical tables can be quite tricky when there are no constraints in place. In this article, we will guide you through ways to avoid duplicates in your Redshift tables.
Mimicking Upsert in Redshift
Performing an UPDATE+INSERT on a conflict is an UPSERT operation. To find the conflict, a unique key column is required as an identifier. Due to the fact that Redshift doesn’t support constraints, the UPSERT operation can be quite tricky. This could also be one of the reasons why UPSERT statements are not natively supported by Redshift.
AWS is aware of this shortcoming and has ways to overcome this problem, which involves a MERGE operation by using temporary or staging tables. There are two ways to mimic the UPSERT operation in Redshift:
- Merge By Rows - Delete the matching records in the target table and push all the records from staging.
- Merge By Columns - Delete the matching records in the staging table after updating them in the target table. Push the remaining new records to the target table.
But among the strategies mentioned in the documentation, which method is more efficient compared to the other? Let’s find out.
Strategy 1 - Merge By Rows
When to Use? To update all columns of matching records
This strategy involves the following steps:
- Create a staging table containing the incoming records.
- Delete the rows in the target table that need to be updated by scanning the target table once (all matching rows).
- Merge the entire contents of the staging table to the target table.
- Drop the staging table to mark completion.
Pitfalls
- Cannot be used for large tables, since this method involves purging and replacing all columns of the matching rows.
- A huge deletion operation occurs as part of this Merge operation, and a mandatory Vacuum operation needs to be performed upon completion.
Strategy 2 - Merge By Columns
When to Use? To update only certain columns of matching records.
This strategy involves the following steps:
- Create a staging table containing the incoming records.
- Update the columns of the matching records in the target table.
- Delete the updated records from the staging table.
- Merge the entire contents of the remaining records in the staging table to the target table.
- Drop the staging table to mark completion.
Pitfalls
- Takes longer to complete compared to the previous strategy.
Examples
Based on the strategies discussed above, let’s delve into the details by working on some of the examples.
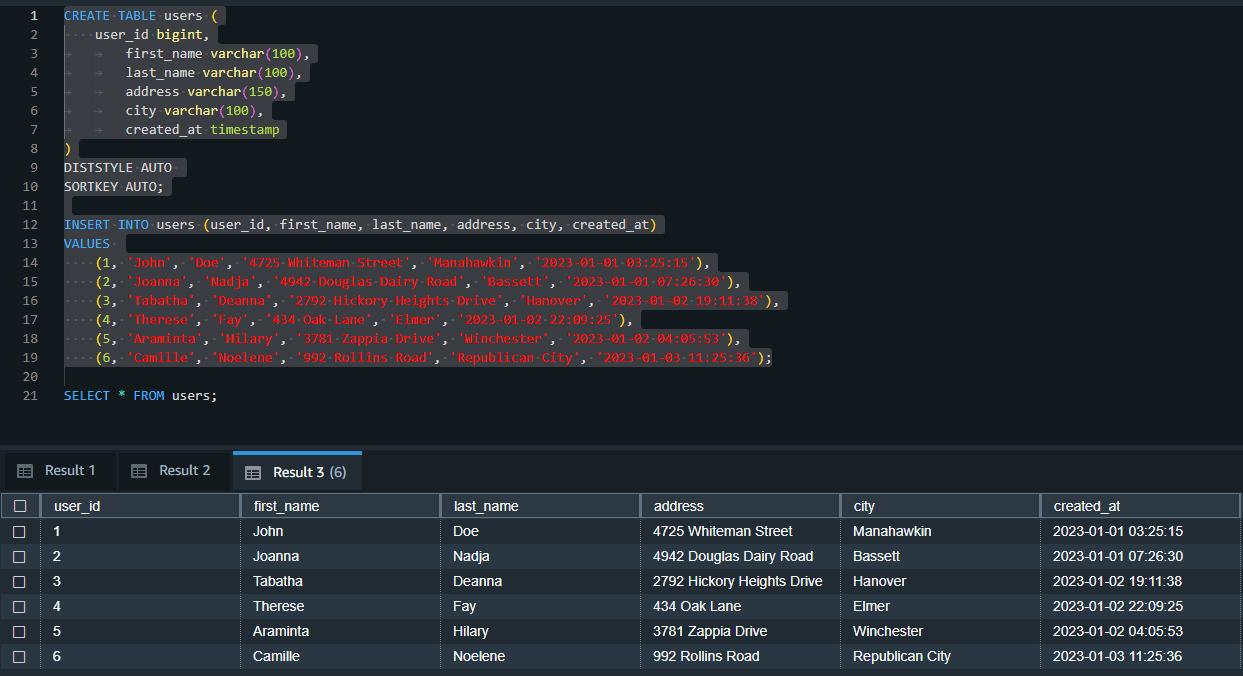
CREATE TABLE users (
    user_id bigint,
		first_name varchar(100),
		last_name varchar(100),
		address varchar(150),
		city varchar(100),
		created_at timestamp
)
DISTSTYLE AUTO
SORTKEY AUTO;

INSERT INTO users (user_id, first_name, last_name, address, city, created_at)
VALUES
    (1, 'John', 'Doe', '4725 Whiteman Street', 'Manahawkin', '2023-01-01 03:25:15'),
    (2, 'Joanna', 'Nadja', '4942 Douglas Dairy Road', 'Bassett', '2023-01-01 07:26:30'),
    (3, 'Tabatha', 'Deanna', '2792 Hickory Heights Drive', 'Hanover', '2023-01-02 19:11:38'),
    (4, 'Therese', 'Fay', '434 Oak Lane', 'Elmer', '2023-01-02 22:09:25'),
    (5, 'Araminta', 'Hilary', '3781 Zappia Drive', 'Winchester', '2023-01-02 04:05:53'),
    (6, 'Camille', 'Noelene', '992 Rollins Road', 'Republican City', '2023-01-03 11:25:36');

SELECT * FROM users;
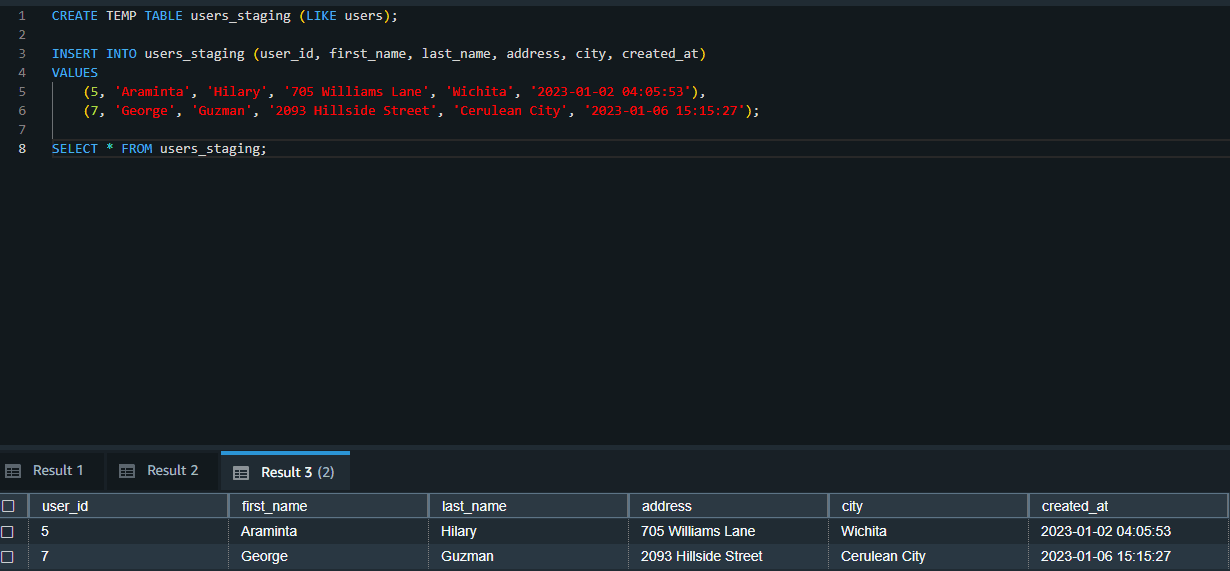
Merge By Rows
As the first step, a temporary table (users_staging) is created similar to the target table (users).
CREATE TEMP TABLE users_staging (LIKE users);

INSERT INTO users_staging (user_id, first_name, last_name, address, city, created_at)
VALUES
    (5, 'Araminta', 'Hilary', '705 Williams Lane', 'Wichita', '2023-01-02 04:05:53'),
    (7, 'George', 'Guzman', '2093 Hillside Street', 'Cerulean City', '2023-01-06 15:15:27');

SELECT * FROM users_staging;
With the temporary table in place, we perform all the required operations inside a single query transaction. This will contain deleting records in the users table that are matching with the users-staging table and inserting all the records from the users_staging table to the users table.
BEGIN TRANSACTION;

DELETE FROM users
USING users_staging
WHERE users.user_id = users_staging.user_id;

INSERT INTO users
SELECT * FROM users_staging;

END TRANSACTION;

SELECT * FROM users;

Upon successful completion of the above transaction, the users-staging table can be dropped and the users table should be vacuumed to re-sort rows and reclaim space.
DROP TABLE users_staging;
VACUUM users;
Merge By Columns
To validate the merge-by-columns strategy, we once again create a temporary table called users-staging. However, this time, the table is created with the column to compare and only includes those columns that have been modified.
CREATE TEMP TABLE users_staging (
    user_id bigint,
		address varchar(150),
		city varchar(100),
		created_at timestamp
);

INSERT INTO users_staging (user_id, address, city, created_at)
VALUES
    (5, '705 Williams Lane', 'Wichita', '2023-01-02 04:05:53'),
    (7, '2093 Hillside Street', 'Chandler', '2023-01-06 15:15:27');

SELECT * FROM users_staging;
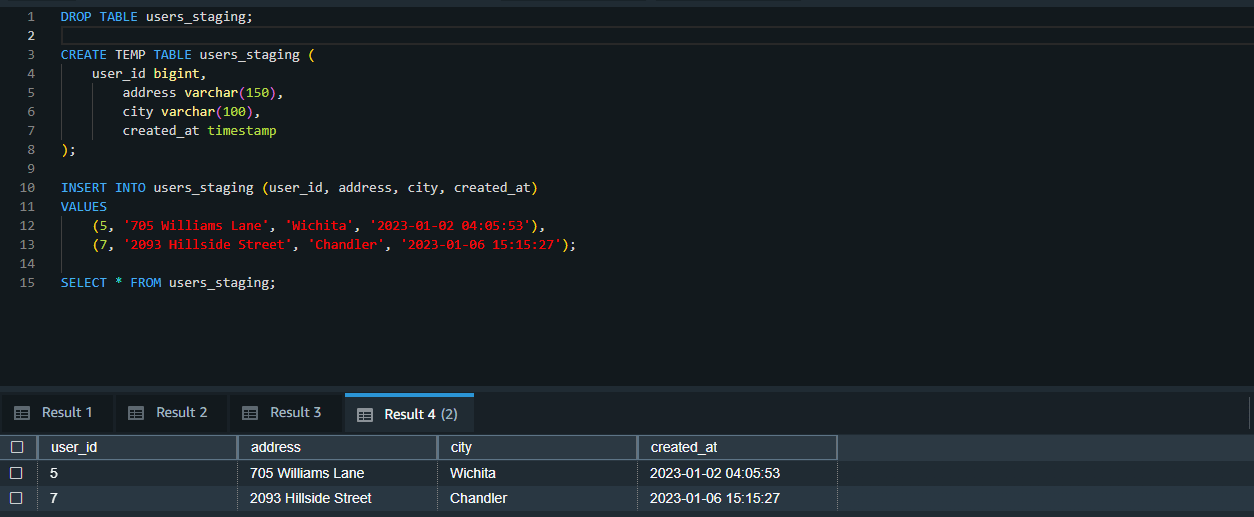
In the above table, please note that the user_id 5 has a set of columns that require updating, while user_id 7 is a completely new record.
We will create a separate query transaction with the following steps:
- Accommodate updates to the
userstable based on the changes in theusers_stagingtable. - Delete the updated records from the
users_stagingtable. - Insert the new records from the
users_stagingtable into theuserstable. Complete the transaction.
BEGIN TRANSACTION;

UPDATE users
	SET
		address = users_staging.address,
		city    = users_staging.city,
created_at = users_staging.created_at
FROM users_staging
WHERE users.user_id = users_staging.user_id;

DELETE FROM users_staging
USING users
WHERE users_staging.user_id = users.user_id;

INSERT INTO users (user_id, address, city, created_at)
(SELECT user_id, address, city, created_at FROM users_staging);

END TRANSACTION;

SELECT * FROM users;
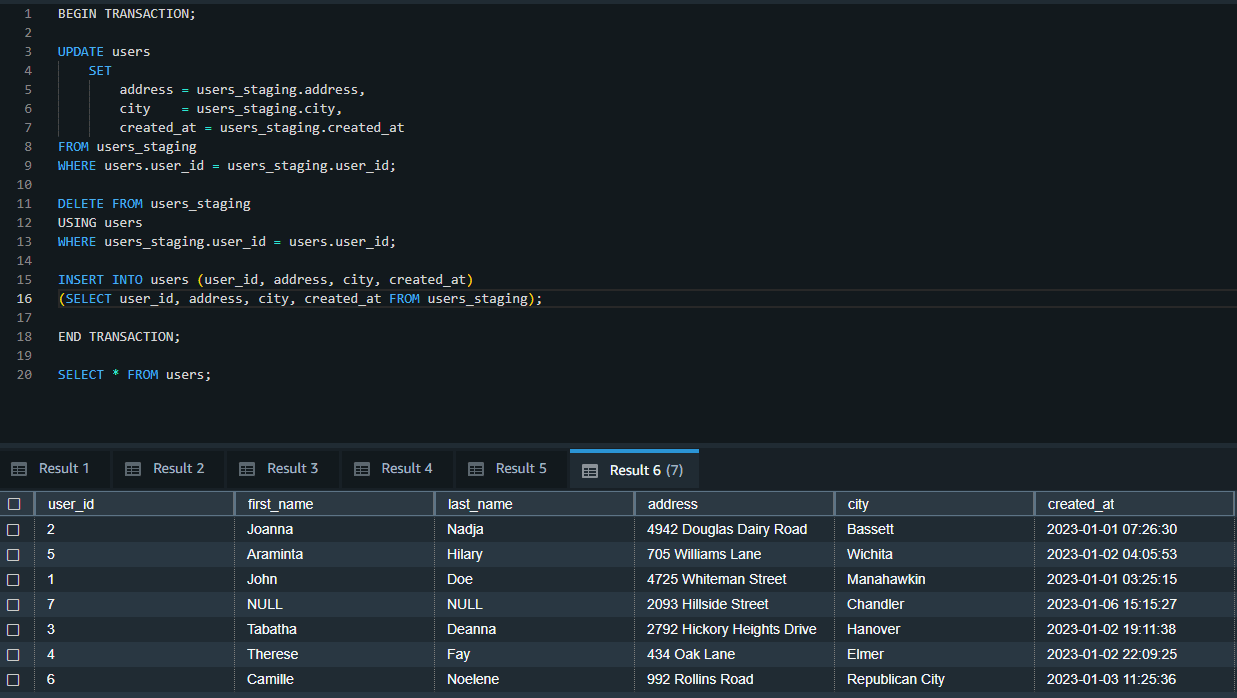
Once the above transactions are successfully completed, the users_staging table is dropped, and the users table is vacuumed to reclaim the space.
DROP TABLE users_staging;
VACUUM users;
UPSERTs can come in quite handy where SCD-Type 1 is the go-to choice for overwriting data in data warehouses. Although Redshift doesn’t support UPSERTs out of the box, based on the examples provided above, UPSERT operations can be recreated.